Welcome to Keymaker™
The easy way to generate secure encryption keys in multiple formats.
ProtegoST® Keymaker™ makes it simple to create encryption keys, serial numbers, product keys and QR codes. KeyMaker™ doesn't restrict you to a set of predefined formats, it enables you to create customized encryption keys and other unique customized identifiers in a easy way. And maybe best of all, this can be achieved without any custom programming! Keymaker™ utilizes a True Random Number Generator (TRNG)1 to ensure that that the random numbers used in generating encryption keys and other sensitive data are totally unpredictable and unbiased, making them highly secure.
With Keymaker™, you don't need to be an expert in cryptology or number theory to generate the output you need. Simply define your desired format and what you want, and Keymaker™ will handle the rest and do the hard work for you.
Keymaker™ offers two methods of access: a user-friendly web interface and a microservice2 that provides a convenient REST API3 delivered by the Keymaker™ server. The web interface can be accessed interactively by users via the Web Client, while the microservice REST API can be accessed by developers using any modern programming language via the REST Client interface. This makes it easy to integrate Keymaker™ solutions into your existing development environment and work flow.
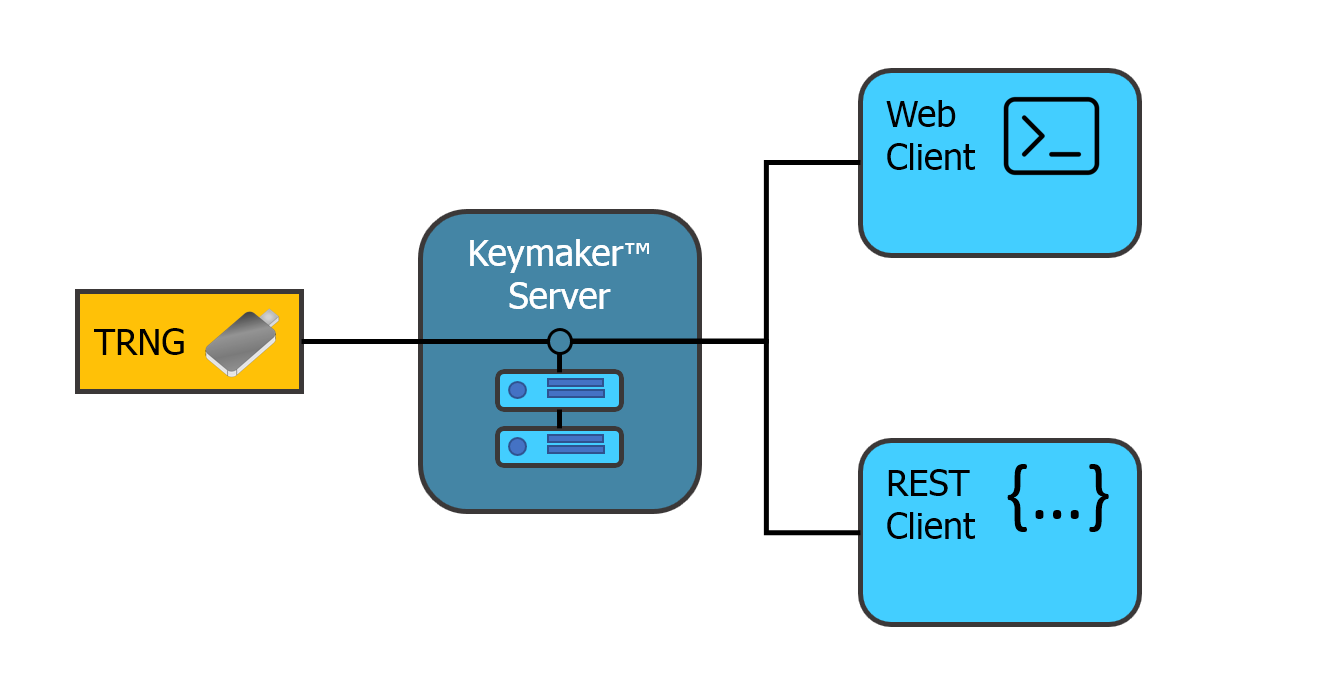 figure 1. Keymaker system overview
Output in different file formats
Keymaker™ allows users to output the generated keys in various file formats such as CSV, JSON or SQL format4. The generated file can be used for transactions against any chosen system that supports the import of the file formats supported. This feature makes it easy to incorporate Keymaker's encryption keys into your existing workflows and for new applications and solutions. When using the REST3 Client interface. The result is in a returned as a text blob.

figure 2. Output in different file formats.
Saving Generated Encryption Keys as SQL Tables
Keymaker™ also allows saving encryption keys in an SQL table chosen by the user. Databases such as Oracle, MSsql, or PostgreSQL are supported. The user can use a JDBC interface5 for this purpose. Directly creating a table in the target database. This feature makes it easy to store the keys and integrate them into existing database management systems and applications. Keymaker™ is fully compatible with popular databases such as PostgreSQL, Oracle, IBM DB2, SQLite, or MSSQL6. Providing an easy way to store the keys and data for future use.
Application Security
User Registration and Security
To ensure the security of users' information, registration is required before logging in to the server or accessing the micro service. Once registered through the Keymaker™ Management Console (KMC), users can take advantage of Keymaker's micro service to generate encryption keys in various formats, making it easy to integrate the service into existing workflows.
Keymaker™ allows users to output the generated keys in various file formats such as CSV, JSON or SQL format4. The generated file can be used for transactions against any chosen system that supports the import of the said file formats. This feature makes it easy to incorporate Keymaker's encryption keys into your existing workflows.
Furthermore, Keymaker™ allows the generated encryption keys to be saved as an SQL table in a database previously chosen by the user, such as Oracle, MSsql or PostgreSQL database. This option provides a convenient way to store the keys for future use and integrate them into your existing database management systems as Oracle, MSSQL6,
True Random Number Generation used
While Keymaker™ may simplify the process of generating encryption keys and other identifiers, it is important to note that the random numbers used through the application are generated through cryptographically secure means, from a physical True Random Number Generator (TRNG)1. A TRNG produce unpredictable and unbiased random numbers based on physical phenomena such as radioactive decay or electronic noise. This means that the random numbers generated by Keymaker™ cannot be guessed or predicted in any way, providing a high level of security for encryption keys and other sensitive data.
Using a TRNG-based approach to generate random numbers is critical for cryptographic applications, as weak or predictable random numbers can make encryption vulnerable to attacks. Additionally, the use of physical TRNGs ensures that the random numbers generated are truly random and not influenced by software or other external factors, further increasing the security of the generated encryption keys.
The system easily integrates with ProtegoST® supplied TRNGs. TRNGSs of other makes and models are also supported by Keymaker™. Contact us at XXXX for more information.
Compliance with FIPS 140-3 Standards
At ProtegoST®, we take security seriously. That's why all output from the Keymaker™ True Random Number Generator (TRNG)1 is tested in accordance with the Federal Information Processing Standards (FIPS) Publication 140-37. This means that you can be guaranteed that the output from Keymaker™ TRNG meets the highest quality and are totaly secure. The TRNG undergoes continius thoroughout testing to ensure that no "bad" output will ever reach your application, providing you with the confidence you need in regards to security and reliability. Compliance with FIPS 140-3 standards is a core feature of Keymaker™, ensuring that the random number generation is secure, reliable, and of the highest quality.
Customizing Encryption Key Formats and Output
Customizing Encryption Key Formats
Keymaker™ provides a flexible solution for customizing the output format of your encryption keys using a format string. This format string is called a FDL-format string, this enables you to specify the desired output format, resulting in the encryption key being formatted in hexadecimal, decimal, alphanumeric, or ASCII format. The Format Description Language (FDL)8 supports this feature by enabling you to define your own format or choose from a list of standard formats.
With the FDL-format string, there are virtually no limitations to how and in what format you can output your encryption keys. If you're familiar with formatting numbers or dates in Microsoft® Excel®, then you'll find the concept to be similar in kind.
Using Keymaker's customizable FDL-format string, you can tailor your encryption keys to your specific needs and integrate them seamlessly into your existing workflows and intended applications. This flexibility ensures that your encryption keys are optimized for their intended use, allowing them to be easily incorporated into your application.
Customizing Encryption Key Output
Once you've selected the desired encryption key format, Keymaker™ enables you to choose the output file format for saving your keys. You can select from a variety of formats, such as comma-delimited (CSV), SQL, or JSON, depending on your needs. Additionally, you have the option to include additional information in the output file rows, such as:
The creation time of the generated keys.
The row number of the key in the output file.
The cyclic redundancy check9 (CRC32) of the generated keys.
Including this information in the output file enables you to customize it to meet the specific requirements of your workflow and intended use.
Creating SQL Tables
As mentioned in the introduction, Keymaker™ also allows the generated encryption keys to be created as an SQL table in a database previously chosen by the user. This feature enables you to store and manage your encryption keys more efficiently and integrate them into your existing database management systems.
The database tables generated by Keymaker™ are in the ANSI-SQL format10, which is a standard SQL language defined by the American National Standards Institute (ANSI). This ensures that the tables are compatible with a wide range of database management systems, enabling you to easily incorporate your encryption keys into your existing systems.
With Keymaker's flexible output options, you can easily integrate your encryption keys into existing systems or workflows, ensuring that they're optimized for your needs and easily accessible when you need them.
Summary of benefits and features
So, in summary, Keymaker™ offers a variety of access methods to suit your needs, whether you prefer an interactive web interface or programmatic access via a microservice2. It provides two methods of access: an easy-to-use web interface and a microservice provided by a convenient REST API. Keymaker™ always uses a True Random Number Generator (TRNG)1 to ensure that the random numbers used in generating encryption keys and other sensitive data are completely unpredictable and unbiased, making them highly secure. The application provides a flexible solution for customizing the output format of encryption keys using a format string. Keymaker™ also allows the generated encryption keys to be saved as an SQL table in a specified database previously chosen by the user. Moreover, compliance with FIPS 140-3 standards is a core feature of Keymaker™ TRNG, ensuring that the random number generation is secure, reliable, and of the highest quality. It also offers easy integration with other systems, making it a useful tool for a variety of custom applications. Keymaker™ is a solution that offers virtually unlimited flexibility, without the need for tedious custom programming.
Getting Started with Keymaker™
Introduction
👉Important! Before you start using Keymaker™, you must obtain login credentials from the system administrator. Your login credentials contain a username and a password. After your first login, please go to Settings and immediately change your password.👈
You should also obtain a URL for the service from the system administrator. Enter this URL in your browser, and you will be greeted with a login screen. Select Login and log in with the credentials (user ID and password), given to you by the system administrator. Please remember to change your temporary password immediately!
How to read the sections of the Keymaker™ User Manual
The Getting Started section is divided into two sections. The first part will introduce you to Keymaker™ and show you how to use it interactively using the easy-to-use web interface. In the second part, you will learn about the features of the interactive application that relate to the microservice2 REST API3.
Using the application in interactive mode
Logging in to the system
You will first come to the welcome screen. This screen is always showed when you have entered the Keymaker™ URL or when you have logged of. To log in, you need a current user ID and password. The supplied password is sent to your e-mail account or by other means. You must use this new password to log in for the first time.
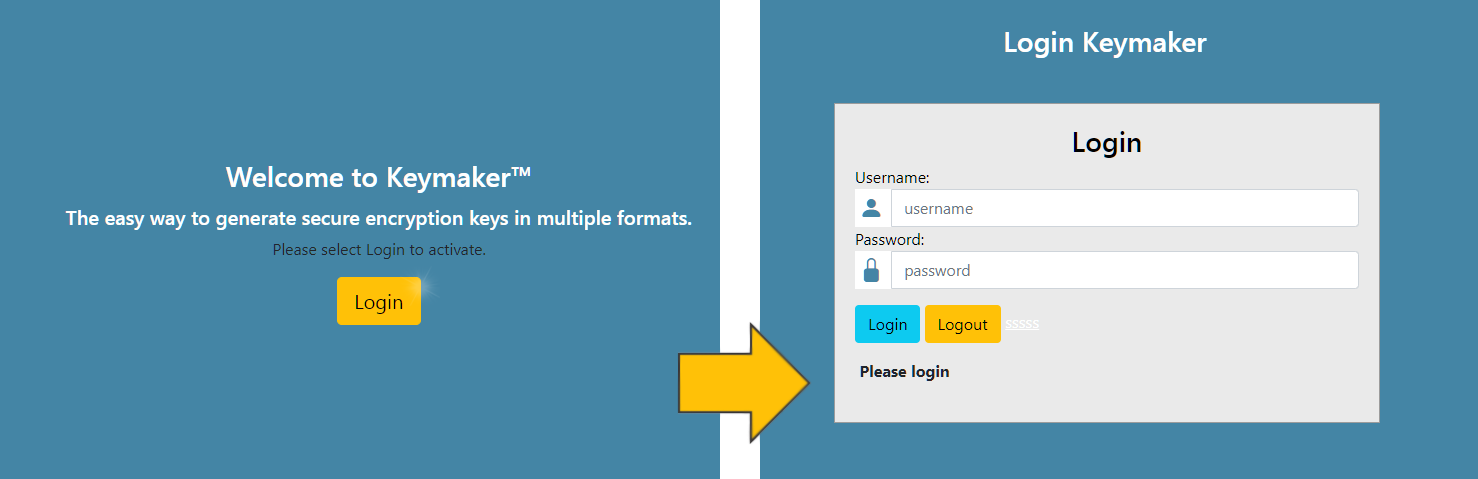
figure 1. Logging in to the system - Welcome screen and Login screen.
video 1. Logon into the system
Settings Page
After you have logged in as a user you will be redirected to the Settings page. On the settings page all settings relevant for you as a user is collected.
For more information see More on Settings.
For now you can leave the settings as they are. But if it's the first time you use the system, you should select the Change Password button before doing anything else.
Change Password

figure 2. Change Password button in Settings
"When you have selected the Change Password button, the Change Password dialog will appear.

figure 3. Change Password Dialog
Enter your old password in the password field and then your new password in the new password field, and then enter it again for verification in the confirm new password field. Select Change, and you will automatically be logged out of the system. We will return to the Settings page further on in this Keymaker™ User Manual. But now we will go on and describe the primary functions of the system.
video 2. Change Password
Keymaker™ the Primary Parts
Below you will find the "navigation map" to Keymaker™.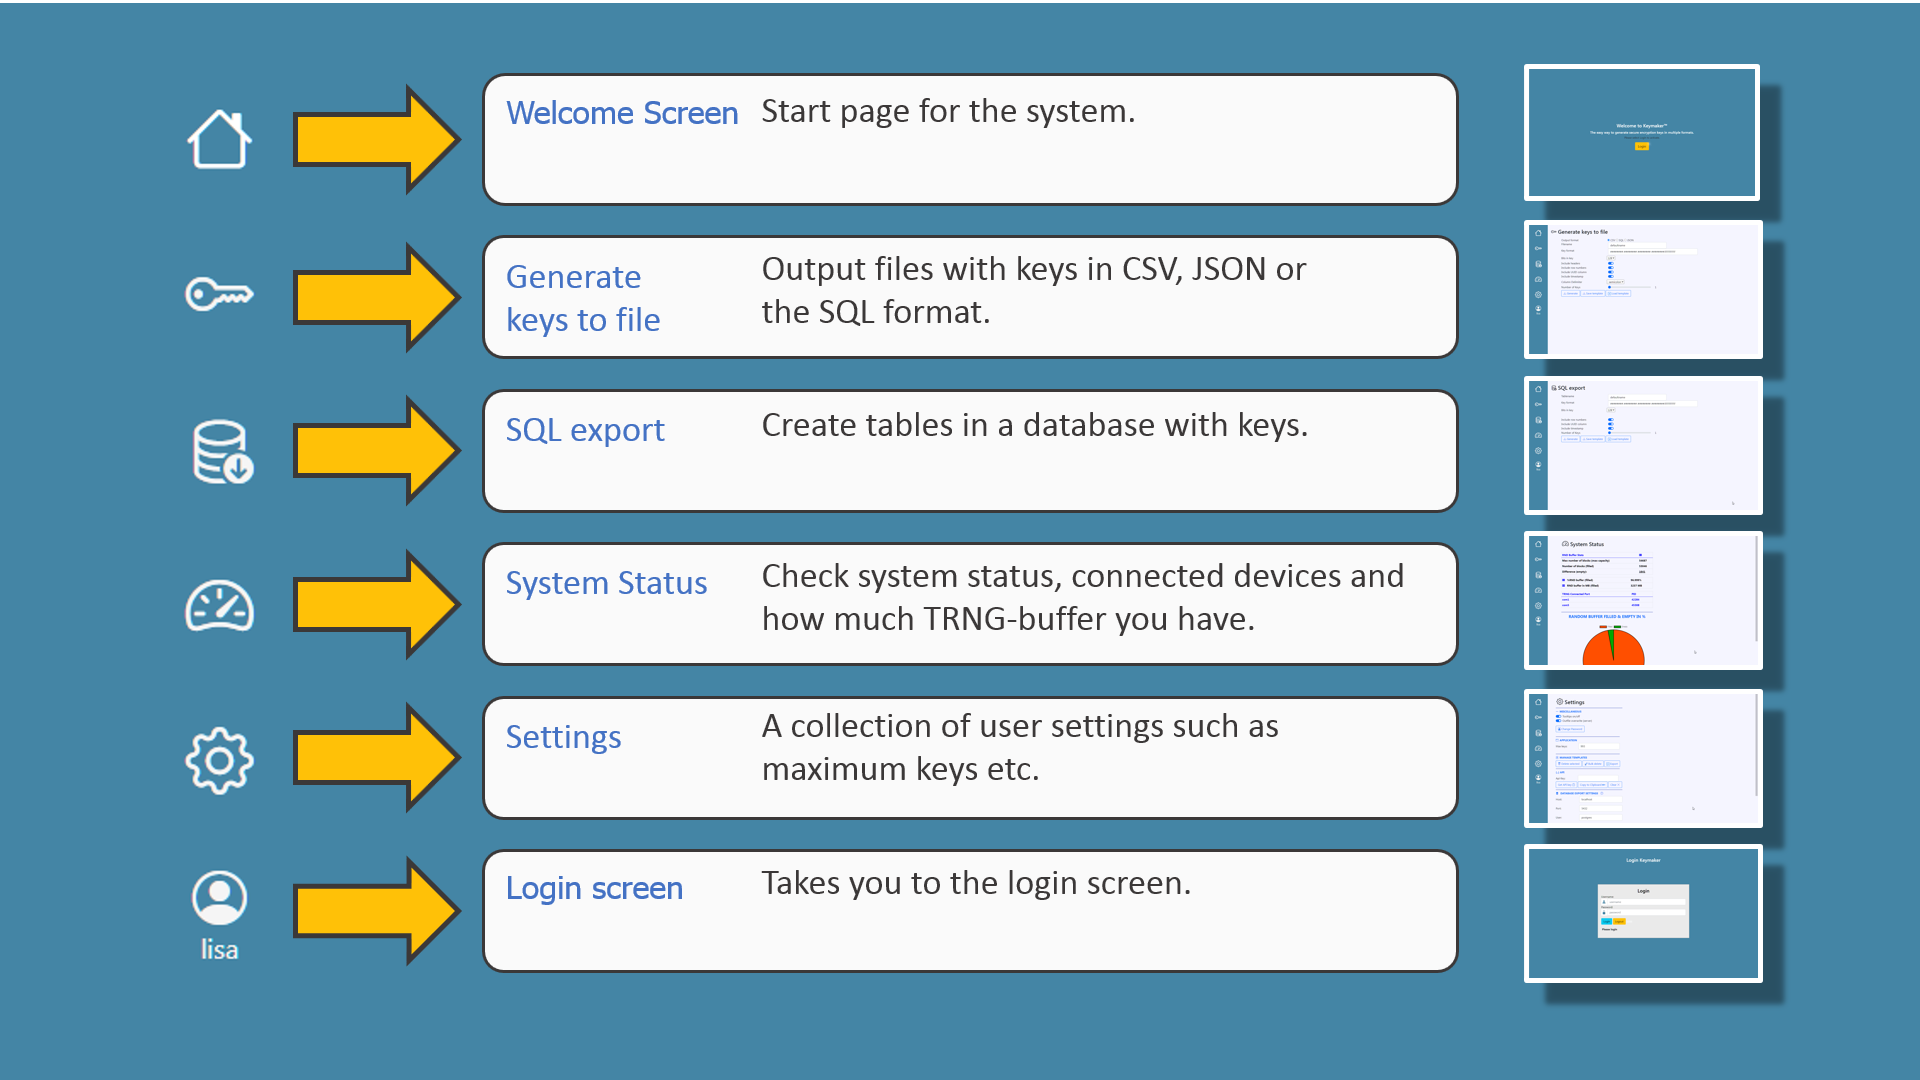 figure 4. The Keymaker™ navigation map
More on Settings
On the Settings page all settings relevant for you as a user is collected.
Showing Tooltips in the application.
Overwrite of output files placed in directory on the server.
Changing password.
Default maximum number of keys possible to generate.
Managing templates for generating keys to file and to SQL export.For more information see The Template System.
API where you can get an API key if you have the right privileges.
Specify the remote database for SQL exports. For more information see Appendix 2. Connecting to an External Database.

Export to database
The video below gives a quick introduction from a user perspective of what is necessary for connecting with an external database. The system administrator must first install approriate drivers on the server for enabling the connection. For more information see Appendix 2. Connecting to an External Database.
video 3. Export to database settings
Tooltip
If you want instant help at all times. Select to enable tooltip on the settings page. Below is a video that decribes how you do it.
video 4. Setting tooltip on or off
API Key
Important for users that has the privileges and the need to access the REST API is the Api key. To get access to a API key, you must first contact the system administrator.
video 5. Get a API key
 Generate keys to a CSV, SQL or JSON file
If you choose the key icon to the left in the system. You can start generating keys.

figure 5. Generate keys to a file. When you have made your selections, you are ready to create the output file. Just select the Generate button in the bottom of the page.
video 6. Generate keys to a CSV file
Output format
Keymaker™ allows users to output the generated keys in various file formats such as CSV, JSON or SQL format4. The generated file can be used for transactions against any chosen system that supports the import of the file formats supported. This feature makes it easy to incorporate Keymaker's encryption keys into your existing workflows and for new applications and solutions. To select the file format that you prefer select the format in the selection control named Output format.
Filename
Here, you can select the file name for the file you wish to create. It is a good idea to choose a descriptive file name. The file extension will be .csv for CSV files, .sql for SQL files, and .json for JSON files.
Key format
In the key format field you specify your desired output key format. This allows you to customize the output format of your encryption keys, through the use of a flexible format string called a FDL-format string, also known as an FDLS. You can specify that you want the output in hexadecimal, decimal, alphanumeric, or ASCII format with a FDLS. You can define your own format or choose from quick format, using the Format Description Language (FDL)8.
An example:
As an example how you in practice can specify a custom FDLS, we will replace the default FDLS with a new string. Our goal is to generate a 64-bit key in hexadecimal, that will be used as a product key. The first thing we do is to type in a new FDLS into the Key format field like this:

figure 6. FDLS for a custom key format
This text, you can copy this FDLS directly into the Key format field.
productkey:####/####/####-####
Make sure that the Bits in keyfield is set to 64 bits. In the Key format field you should see the following characters: productkey:####/####/####-####
The meaning of the individual charters in the string is explained below:
the first part of the string is productkey,
then there is a colon(:),
then hash signs (#), where ever the program finds a hash sign, it replaces it with a 8 -bit hexadecimal number.
between the hash signs there are delimiters for making the key easier to read, forward slash (/) and hyphen (-).
There are also "quick FDLS" for defining your if you do not need advanced formating as an example:
| Character | Description | Example |
|---|---|---|
| $ | base 64 full lenght of key | 0061A85671B41F05 |
| A | Format in ASCII | rg&<$@3B |
| B10 | Base 64 with length 10 | a7hOwv+ga7 |
| @ | Numeric positive integer | 199566710131161742035312991318290078543 |
Table 1. Quick FDLS
This "quick FDLS"8 will always expand to the full length of the defined Bits in key field by default. So if you define a $ FDLS with no length specification like $10, where the number 10 specifies the number of hex chars. It will expand to the full length of the number of bits specified in the Bits in keyfield.
"This 'quick FDLS' will always expand to the full length of the defined 'Bits in key' field by default. For example, if you define a '$' FDLS with no length specification like '$10', where the number '10' specifies the number of characters outputted, it will expand to the full length of the number of bits specified in the 'Bits in key' field. Note that 'FDL' stands for 'Format Description Language', while 'FDLS' stands for 'Format Description Language String'."
For more information about FDL and how to define a FDLS-Format string seeCustomizing Encryption Key Formats and Output in the first section of this manual and the, see the Format Description Language (FDL) Appendix of this user manual.
Bits in key
The number of bits taken from the TRNG input determines, as an example, how many hexadecimal numbers you can generate with a specific FDL-format string in the Key format input field. This is specified in the Bits in key field. If you specify the wrong number of bits in relation to the number of bits that are consumed by your FDLSs, you will get an error like this:
 figure 7. Error from wrong a formatted FDLS or wrong number of bits specified in the
 Bits in key field.
Column and header selections
For the desired output you can also add informative columns to the output. You can add a header row to a CSV file. You can add row numbers, a UUID column for unique identification and a time stamp when the row with the key was created to any file. For CSV files you can have different delimiters for column separation.
 figure 8. Selections available for column and header selection
Include headers (csv only)
This option adds a row of headers for the chosen columns. This option is only availible for CSV formatted files selected in the Output format field.
Include row numbers
This option adds a column with consecutive row numbers from 1 to the number of specified in the Number of Keys field. This option is applicable to all file formats availible in the Output format field.
Include UUID column
This option adds a column with a UUID version 4. This option is applicable to all file formats availible in the Output format field. This is a example of a UUID version 4 string:
28aacd36-922c-4ab0-9933-a3bcc5c8642c
Include timestamp
This option adds a column with a timestamp in the ISO 8601 format. This option is applicable to all file formats availible in the Output format field. This is a example of a timestamp in the ISO 8601/ANSI SQL format:
2023-03-10 15:46:01.106949
This time value is taken from the server.
Column Delimiter (csv only)
For CSV files you can select different column delimiters. The choices are:
Semicolon (:)
Comma (,)
Tab (->) The choosen selection, Tab ads a non printable charachters with the value of 9 in decimal or 0x09 in hexadecimal notation, as an column delimiter to the CSV-file.
Number of Keys
This selects how many rows with keys the output file will contain. One key equals on row in the output.The maximum Number of Keys that are possible to generate is limited of the application Max keys on
the 
Settings page.
video 7. Setting max keys
Making it happen
When you have made your selections you are ready to create the output file. Just select the Generatebutton in the bottom of the page.
How will the output look like?
For all output formats, one thing remains the same: the key is defined by its FDLS. For example, if you have specified a valid FDL string like $ or B10 or productkey:####/####/####-#### or ############-####, you can use them without modification for all different formats, including CSV, SQL, or JSON.
 figure 9. Output file in CSV in Excel and in raw CSV text format.
 figure 10. Output file in SQL
video 8. Generate keys to a JSON file
 figure 11. Output file in JSON
Generate keys into a SQL-database
If you choose the database icon to the left in the system sidebar. You can start generating keys into a database. Most of the settings are the same as the settings in Generate keys to a file. In this section we will show what is different from Generate keys to a file. You can use the same FDLSs as when you generated files. You can reuse your templates that you saved in Generate keys to a file. The differnce is that the filename becomes the table name.
To generate a database table you must first establish a connection to a JDBC compatibel database[]. When you have the relevant connection parameters. You register them in the `Settings - DATABASE EXPORT SETTINGS section. You can test if you have a valid connection there. If the connection is succesfull the parameters will be stored there.
Those settings that is exclusive for CSV files, are naturally excluded from the settings on the SQL export page.

figure 12. Generate keys to a database table. When you have made your selections, you are ready to create your table. Just select the Generate button in the bottom of the page.
video 9. SQL export of a table
Table name
This is the name of the table that will be created in the specified database.
Key format
In the key format field you specify your desired output key format. This allows you to customize the output format of your encryption keys, through the use of a flexible format string called a FDL-format string, also known as an FDLS. You can specify that you want the output in hexadecimal, decimal, alphanumeric, or ASCII format with a FDLS. You can define your own format or choose from quick format, using the Format Description Language (FDL)8.
An example:
As an example how you in practice can specify a custom FDLS, we will replace the default FDLS with a new string. Our goal is to generate a 64-bit key in hexadecimal, that will be used as a product key. The first thing we do is to type in a new FDLS into the Key format field like this:
Bits in key
The number of bits taken from the TRNG input determines, as an example, how many hexadecimal numbers you can generate with a specific FDL-format string in the Key format input field. This is specified in the Bits in key field. If you specify the wrong number of bits in relation to the number of bits that are consumed by your FDLSs, you will get an error like this:
figure 13. Error from wrong a formatted FDLS or wrong number of bits specified in the Bits in key field.
Column and header selections
For the desired output you can also add informative columns to the output. You can add a header row to a CSV file. You can add row numbers, a UUID column for unique identification and a time stamp when the row with the key was created to any file. For CSV files you can have different delimiters for column separation.
figure 14. Selections available for column and header selection
Include row numbers
This option adds a column with consecutive row numbers from 1 to the number of specified in the Number of Keys field. This option is applicable to all file formats availible in the Output format field.
Include UUID column
This option adds a column with a UUID version 4. This option is applicable to all file formats availible in the Output format field. This is a example of a UUID version 4 string:
28aacd36-922c-4ab0-9933-a3bcc5c8642c
Include timestamp
This option adds a column with a timestamp in the ISO 8601 format. This option is applicable to all file formats availible in the Output format field. This is a example of a timestamp in the ISO 8601/ANSI SQL format:
2023-03-10 15:46:01.106949
This time value is taken from the server.
Number of Keys
This selects how many rows with keys the output table will contain.
One key equals on row in the output. The maximum Number of Keys that are possible to generate is limited of the application Max keys is on the 'Settings page.'
Making it happen
When you have made your selections you are ready to create the output file. Just select the Generatebutton in the bottom of the page.
The Template System
Important! When generating keys, both for saving to a file and exporting as an SQL Table. You can save the settings in a Template. This Template' can be loaded later and reused. The template is also available for the REST API3.
video 10. Save a template
video 11. Load a template
Saving Templates and Reading/Loading Templates
Permission to Read/Load Templates
⚫️ Generate keys to a CSV, SQL or JSON file Generate keys to file
⚫️ Generate keys into a SQL-database SQL export
Permission to Read only Templates
⚫️ The REST API
System Status
The True Random Number Generators that are connected to the system uses a disk buffer. The random numbers collected are encrypted by the driver and written to disk. In this way no collected randomness is wasted and the system gets an very high read speed. Keymaker can accommodate a great number of TRNGs connected to the system in parallel. The system administrator can set a maximum number of disc space aside for the RND Buffer. In the case below 3337 mega byte. Right now the buffer contains 3237 mega byte of randomness. This buffer is filling up 24/7. The TRNG Connected Port section shows that there are two TRNG devices connected to the server.
 figure 15. System status
Logout from Keymaker™
Logout from the system can be done in two ways. Either select the home icon in the left-top sidebar or the user icon in the left-bottom of the sidebar.
video 12. Logout from Keymaker
Summary
After reading this section, you shall have learnt how to use the application in interactive mode, log in to the system, access and adjust settings, generate keys to a CSV, SQL or JSON file, and generate keys into a SQL-database. For more information about using the system to it's fullest, go to the Appendix Format Description Language FDL.
Keymaker™ API Documentation v 1.0
The Keymaker™API - an introduction
The Keymaker™ API is a REST API, fully featured and easy to integrate with. A REST (Representational State Transfer) API is a type of web service that follows certain constraints and principles. The main features of a REST API are:
Client-Server Architecture: REST API separates the client and server components of an application, which allows for flexible and scalable development. You can implement a call to the service in virtually any language of your choice.
Statelessness: REST APIs do not store client context on the server between requests, which makes the API scalable and less prone to errors.
Layered System: REST APIs can operate over a variety of networks and can be used by multiple systems, as long as they adhere to the constraints of the REST architecture.
Use of HTTP Methods: REST APIs use HTTP methods such as GET, POST, PUT, DELETE, etc. to perform operations on resources.
Return of Representations: REST APIs return a representation of the requested resource, which can be in various formats such as XML, JSON, etc. The Keymaker™ API returns values in JSON and text. It could also directly create resources on the server side as an example database tables.
The Keymaker™ API has predictable resource-oriented URLs, accepts form-encoded request bodies, returns JSON-encoded responses, and uses standard HTTP response codes and authentication. Additionally, the Keymaker™ API is secured by the use of a JWT Bearer Token in the HTTP request headers. This provides an extra layer of security and ensures that only authorized clients are able to access the API and its resources.
Using the examples
The sample code in this document has been designed to help you quickly and easily implement the functionality you require. The examples include code in Python, JavaScript fetch, and Curl calls, providing a range of options for you to choose from, depending on your preferred programming language or tool. Although they are ready to use, they will likely need to be modified to fit your specific needs and requirements. To help you understand how the code works and how to implement it, we've provided a series of examples that illustrate different aspects of the functionality.
Throughout these examples, you will come across the URL https://acme.keym.net:5000. This URL is used as an example only and should be replaced with your own host address when you use the code. Your host address is the address of the server that will host your website or application.
By customizing the examples to match your host address and other specific requirements, you can quickly and easily implement the functionality you need. Whether you're just starting out with web development or are an experienced developer, these examples are a great resource to have at your fingertips. Throughout the examples you will find a variable called baseurl, it will in the examples have the value "baseurl = "https://acme.keym.net:5000/"", please replace it with your own server value.
Authorization Process
To access the API, users must first request authorization from an assigned administrator. The administrator will review the request and grant access if deemed appropriate.
Once the authorization is granted, the user will receive an API key through the Keymaker web interface. This key will be used to access the API and its associated resources. It's important to note that authorization is subject to review and can be revoked by the administrator at any time if necessary.
By implementing this authorization process, we ensure that only users with a legitimate need for access to the API can use it. This helps to maintain the security and integrity of the API and its data, and protects against unauthorized access and misuse.
Bearer Token - Authentication
Bearer tokens are an authentication mechanism where a client sends a token to the server to prove their identity. The term "bearer" refers to the fact that the token "bearer" (or holder) of the token has the right to access the resources protected by the token. You get your token by calling the /get_token route. After calling /get_token with a valid API key, you will obtain a JSON Web Tokens (JWT). The terms Token, JWT and JSON Web Tokens are used interchangeably in this document.
JSON Web Tokens (JWT) are a popular format for bearer tokens. A JWT is a JSON object that contains information about the authentication and authorization of a user. It is signed by the server and can be verified to ensure that it has not been tampered with.
JWTs are used for authentication and authorization in RESTful APIs. They are usually passed in the "Authorization" header of a HTTP request, with the value "Bearer [token]". The server can then use the information in the JWT to verify the identity of the client and determine what resources they are allowed to access.
In the Keymaker™ implementation the token generated on the server side contains a random response number. When the server revokes the token after a predetermined time. You must regenerate the token again.

Flow diagram: How to get a Token for using the API
API key
If you wish to utilize the Keymaker™ API, you must obtain a valid API key. This key enables you to make API requests and access the necessary data and functionality. You can obtain the API key through the Keymaker™ web interface or through the admin console. For further instructions, please refer to the Keymaker™ User Manual.
The example code below shows you how to use the API key and the /get_token route route to obtain a token, which is a bearer token or a JSON Web Token (JWT). The resulting bearer token or JSON Web Token (JWT) is then utilized in a call to the /get_db_server_time route route to retrieve the server time. This provides a basic understanding of API usage and how to authenticate your API requests. You can use this code as a starting point and modify it as needed to fit your specific requirements.
Run your first API request
Python
ximport requestsimport json
def get_token(url, api_key_str): route = "//get_token" call = url + route api_key = {"api_key": ""} api_key["api_key"] = api_key_str payload = json.dumps(api_key) headers = {'Content-Type': 'application/json'} response = requests.request("POST", call, headers=headers, data=payload) return response.text
url = "https://acme.keym.net:5000"api_key ="c3d9284ad5c7fbf5cc3ae29c117857b7008f1a74b174141e06285e10fd484420"jwt = get_token( url, api_key)
https://acme.keym.net:8080headers = { "Authorization": "bearer " + jwt} # Set headers
url_call = "https://acme.keym.net:5000//get_db_server_time"time = requests.get(url_call, headers=headers) # Make requestprint(time.text) Javascript Fetch
xxxxxxxxxxasync function getToken(url, apiKeyStr) {   const route = "/get_token";   const call = url + route;   const apiKey = { api_key: "" };   apiKey.api_key = apiKeyStr;   const payload = JSON.stringify(apiKey);   const headers = { 'Content-Type': 'application/json' };   const response = await fetch(call, { method: 'POST', headers, body: payload });   return response.json();}
const url = "https://acme.keym.net:5000";const apiKey = "c3d9284ad5c7fbf5cc3ae29c117857b7008f1a74b174141e06285e10fd484420";const jwt = await getToken(url, apiKey);
const headers = {   Authorization: "bearer " + jwt}; // Set headers
const urlCall = "https://acme.keym.net:5000/get_db_server_time";const time = await fetch(urlCall, { headers }); // Make requestconsole.log(await time.text());
Curl - example of getting a Token and using it in a further API call.
xxxxxxxxxx# Get tokenjwt=$(curl -s -L -X POST \  https://acme.keym.net:5000/get_token \  -H 'Content-Type: application/json' \  -d '{"api_key": "caea1e59a2e7a1dddf5a9581afa442d71b5a2c95106211c6e7a22d3e627fb486"}')
# Get db server timetimes=$(curl -s -L -X GET \  https://acme.keym.net:5000/get_db_server_time \  -H 'Authorization: Bearer '"${jwt}"  )
echo "The time is: $times"
API-Definitions
| HTTP request endpoint | Description | Protected |
|---|---|---|
| GET /get_token | Get JWT token from server | No |
| GET /get_db_server_time | Get the server time | Yes |
| GET /getcachstats | Get stats from server | Yes |
| GET /getprofileID | Get profile settings with a specific ID number | Yes |
| GET /getsymkey | Generates a symmetric key collection to different formats | Yes |
| GET /getsymkeysql | Generates a symmetric key collection to a SQL table | Yes |
| GET /getuuid | Generates UUID v 4.0 | Yes |
| GET /isrunning | Shows if the server is running | Yes |
| GET /randomnumber | Generates randomnumbers - flytta upp | Yes |
Note: All HTTP request endpoints are protected by a bearerAuth token. This with one exception. The GET /get_token where the request body contains the API Key. This route returns the JWT token subsequently used for accessing the protected routes in the above table.
 /get_token - Get JWT token from server
Request Parameters: No parameters
HTTP request headers
Content-Type: Not defined
"Authorization": "Bearer {token}"
JSON Body The request body should contain a JSON object with the following structure:
xxxxxxxxxx{ "api_key": "caea1e59a2e7a1dddf5a9581afa442d71b5a2c95106211c6e7a22d3e627fb486"}Json body fields explained /getsymkey
| Fields in Json | example | possible values | min/ values | max/ values | comment |
|---|---|---|---|---|---|
| api_key: | see above | text | N/A | 1.000.000 | Maximum number of rows to generate. |
Response
HTTP Status Codes
| Code | Description |
|---|---|
| 200 | Success. The request was successful, and the response body contains the JWT token.* |
| 400 | Bad Request. The request was invalid. INVALIDAPICALL |
| 403 | Forbidden. The request was invalid. NOAPIPERMISSION. The client does not have permission to access the requested resource |
*Example Success Response: HTTP Status Code: 200 eyJhbGciOiJIUzI1NiIsInR5cCI6IkpXVCJ9.eyJzdWIiOiIxMjM0NTY3ODkwIiwibmFtZSI6IkpvaG4gRG9lIiwiaWF0IjoxNTE2MjM5MDIyfQ.SflKxwRJSMeKKF2QT4fwpMeJf36POk6yJVadQssw5c Return type: TEXT
Example Error Response (HTTP Status Code: 400): "INVALIDAPICALL". Return type: TEXT
Note that the actual JWT token value in the success response is a dummy value, and you should replace it with a real JWT token in your implementation.
Examples
Python
xxxxxxxxxximport requestsimport json
def get_token(url, api_key_str):    payload = json.dumps({"api_key": api_key_str})    headers = {'Content-Type': 'application/json'}    response = requests.post(url, headers=headers, data=payload)    return response.text
base_url = "https://acme.keym.net:5000"call = "/get_token" api_key = "caea1e59a2e7a1dddf5a9581afa442d71b5a2c95106211c6e7a22d3e627fb486"url = base_url + calljwt = get_token(url, api_key)print(jwt)
javascript fetch
xxxxxxxxxxasync function getToken(url, apiKeyStr) {  const payload = JSON.stringify({api_key: apiKeyStr});  const headers = {'Content-Type': 'application/json'};  const response = await fetch(url, {method: 'POST', headers: headers, body: payload});  return await response.text();}
const baseUrl = "https://acme.keym.net:5000";const call = "/get_token";const apiKey = "caea1e59a2e7a1dddf5a9581afa442d71b5a2c95106211c6e7a22d3e627fb486";const url = baseUrl + call;
getToken(url, apiKey)  .then(jwt => console.log(jwt))  .catch(error => console.error(error));
curl
xxxxxxxxxxcurl -X POST -H "Content-Type: application/json" -d '{"api_key": "caea1e59a2e7a1dddf5a9581afa442d71b5a2c95106211c6e7a22d3e627fb486"}' "https://acme.keym.net:5000/get_token" /get_db_server_time - Get the server time
Request Parameters: No parameters
HTTP request headers
Content-Type: Not defined
"Authorization": "Bearer {token}"
Response
HTTP Status Codes
| Code | Description |
|---|---|
| 200 | Success. The request was successful |
| 201 | Bad Request. The request was invalid. "Authorization error" |
Example Success Response: HTTP Status Code: 200 time:"2023-02-10 09:23:35", Return type: TEXT
Example Error Response (HTTP Status Code: 201): "Authorization error",Return type: TEXT
Examples
Python
xxxxxxxxxximport requests#get_db_server_time#testedbaseurl = "https://acme.keym.net:5000/"token = "eyJhbGciOiJIUzI1NiIsInR5cCI6IkpXVCJ9.eyJybmQiOiAiY2QzM2NiMjItYWI0OS00NjNkLWExYzQtYzhmMGI0OTgwZDU1IiwgIm5hbWUiOiAibGlzYSIsICJhZG1pbiI6IGZhbHNlfQ.KCwLDpet78DB1KOUv02W_9HeTkyervzS2y2HYT4VQ2U"url = baseurl + "/get_db_server_time"headers = { "Authorization": "Bearer " + token}response = requests.get(url, headers=headers)print(response.text)javascript fetch
xxxxxxxxxxasync function getDbServerTime() {  const baseUrl = "https://acme.keym.net:5000/";  const token = "eyJhbGciOiJIUzI1NiIsInR5cCI6IkpXVCJ9.eyJybmQiOiAiY2QzM2NiMjItYWI0OS00NjNkLWExYzQtYzhmMGI0OTgwZDU1IiwgIm5hbWUiOiAibGlzYSIsICJhZG1pbiI6IGZhbHNlfQ.KCwLDpet78DB1KOUv02W_9HeTkyervzS2y2HYT4VQ2U";  const url = baseUrl + "/get_db_server_time";  const headers = {    "Authorization": "Bearer " + token  };
  const response = await fetch(url, { headers });  const responseText = await response.text();  console.log(responseText);}getDbServerTime();
Curl
xxxxxxxxxxcurl -X GET \ https://acme.keym.net:5000/get_db_server_time \ -H 'Authorization: Bearer eyJhbGciOiJIUzI1NiIsInR5cCI6IkpXVCJ9.eyJybmQiOiAiY2QzM2NiMjItYWI0OS00NjNkLWExYzQtYzhmMGI0OTgwZDU1IiwgIm5hbWUiOiAibGlzYSIsICJhZG1pbiI6IGZhbHNlfQ.KCwLDpet78DB1KOUv02W_9HeTkyervzS2y2HYT4VQ2U' /getcachstats - Get stats from server
Request Parameters: No parameters
HTTP request headers
Content-Type: todo
"Authorization": "Bearer {token}"
Response
HTTP Status Codes
| Code | Description |
|---|---|
| 200 | Success. The request was successful |
| 201 | Bad Request. The request was invalid. "Authorization error" |
Example Success Response: HTTP Status Code: 200 time:"2023-02-10 09:23:35", Return type: TEXT
Example Error Response (HTTP Status Code: 201): "Authorization error",Return type: TEXT
Examples
Python
xxxxxxxxxxbaseurl = "https://acme.keym.net:5000/" #replace with your server routetoken = "eyJhbGciOiJIUzI1NiIsInR5cCI6IkpXVCJ9.eyJybmQiOiAiY2QzM2NiMjItYWI0OS00NjNkLWExYzQtYzhmMGI0OTgwZDU1IiwgIm5hbWUiOiAibGlzYSIsICJhZG1pbiI6IGZhbHNlfQ.KCwLDpet78DB1KOUv02W_9HeTkyervzS2y2HYT4VQ2U"url = baseurl + "/getcachstats"headers = { "Authorization": "Bearer " + token, 'Content-Type': 'application/json'}response = requests.request("GET", url, headers=headers)print(response.text)javascript fetch
xxxxxxxxxxfetch("https://acme.keym.net:5000/getcachstats", { headers: { "Authorization": "Bearer eyJhbGciOiJIUzI1NiIsInR5cCI6IkpXVCJ9.eyJybmQiOiAiY2QzM2NiMjItYWI0OS00NjNkLWExYzQtYzhmMGI0OTgwZDU1IiwgIm5hbWUiOiAibGlzYSIsICJhZG1pbiI6IGZhbHNlfQ.KCwLDpet78DB1KOUv02W_9HeTkyervzS2y2HYT4VQ2U", 'Content-Type': 'application/json' }}) .then(response => response.text()) .then(data => console.log(data)) .catch(error => console.error(error));Curl
xxxxxxxxxxcurl -X GET \ https://acme.keym.net:5000/getcachstats \ -H 'Authorization: Bearer eyJhbGciOiJIUzI1NiIsInR5cCI6IkpXVCJ9.eyJybmQiOiAiY2QzM2NiMjItYWI0OS00NjNkLWExYzQtYzhmMGI0OTgwZDU1IiwgIm5hbWUiOiAibGlzYSIsICJhZG1pbiI6IGZhbHNlfQ.KCwLDpet78DB1KOUv02W_9HeTkyervzS2y2HYT4VQ2U' \ -H 'Content-Type: application/json' /getprofileid - Get profile settings with a specific ID number
Request
The request must be done on a profile saved by a registred user on the interactive web interface to the system. For further instructions, please refer to the Keymaker™ User Manual section (TODO Link).
| Parameter | Type | Description | Required |
|---|---|---|---|
| idnumber | Number | Record number of profile | [optional] |
| user | String | Name of user that saved the profile | [optional] |
Return type: json
HTTP request headers
Content-Type: Not defined
Accept: application/json
"Authorization": "Bearer {token}"
Examples
Python
xxxxxxxxxximport requestsimport json
baseurl = "https://acme.keym.net:5000/"token = "eyJhbGciOiJIUzI1NiIsInR5cCI6IkpXVCJ9.eyJybmQiOiAiY2QzM2NiMjItYWI0OS00NjNkLWExYzQtYzhmMGI0OTgwZDU1IiwgIm5hbWUiOiAibGlzYSIsICJhZG1pbiI6IGZhbHNlfQ.KCwLDpet78DB1KOUv02W_9HeTkyervzS2y2HYT4VQ2U"url = baseurl + "/getprofileID?idnumber=1&user=lisa"headers = {    "Authorization": "Bearer " + token,    'Content-Type': 'application/json'}response = requests.request("GET", url, headers=headers)print(response.text)
javascript fetch
xxxxxxxxxxfetch("https://acme.keym.net:5000/getprofileID?idnumber=1&user=lisa", { headers: { "Authorization": "Bearer eyJhbGciOiJIUzI1NiIsInR5cCI6IkpXVCJ9.eyJybmQiOiAiY2QzM2NiMjItYWI0OS00NjNkLWExYzQtYzhmMGI0OTgwZDU1IiwgIm5hbWUiOiAibGlzYSIsICJhZG1pbiI6IGZhbHNlfQ.KCwLDpet78DB1KOUv02W_9HeTkyervzS2y2HYT4VQ2U", 'Content-Type': 'application/json' }}) .then(response => response.text()) .then(data => console.log(data)) .catch(error => console.error(error));Curl
xxxxxxxxxxcurl -X GET \ https://acme.keym.net:5000/getprofileID?idnumber=1&user=lisa \ -H 'Authorization: Bearer eyJhbGciOiJIUzI1NiIsInR5cCI6IkpXVCJ9.eyJybmQiOiAiY2QzM2NiMjItYWI0OS00NjNkLWExYzQtYzhmMGI0OTgwZDU1IiwgIm5hbWUiOiAibGlzYSIsICJhZG1pbiI6IGZhbHNlfQ.KCwLDpet78DB1KOUv02W_9HeTkyervzS2y2HYT4VQ2U' \ -H 'Content-Type: application/json' /getsymkey - Generates a symmetric key to different formats
Json body
xxxxxxxxxx{ "maxrows": 10, "bits": 128, "formatstring": "'########-########-########-########!FFFFFFFF'", "outputformat": "json", "exclusive_csv": { "columndelimiter_csv": ";", "header_if_csv": False }, "outfilename": "", "isrownumbers": True, "gen_uuid": True, "set_time": True}Json body fields explained /getsymkey
| Fields in Json | example | possible values | min/ values | max/ values | comment |
|---|---|---|---|---|---|
| maxrows: | 100 | Numeric | 1 | 1.000.000 | Maximum number of rows to generate. |
| bits: | 128 | 64, 128, 256, 512 | 64 | 512 | Multiples of bits shall match formatstring. |
| formatstring: | "'$'" | FDL - Format | N/A | N/A | Refer to the FDL - Format description Language |
| outputformat: | "json" | CSV, SQL, JSON | N/A | N/A | Outputformat in CSV, ANSI SQL and JSON. |
| exclusive_csv->columndelimiter_csv: | ";" | ; , (->) | N/A | N/A | Semicolon, comma ord tab (only for csv) |
| exclusive_csv->header_if_csv: | False | False | True | Include header (only for csv) | |
| outfilename: | "testfile" | valid filenames | N/A | N/A | Any valid filename for the operating system |
| isrownumbers: | True | 1 to maxrows | False | True | Include row numbers |
| gen_uuid: | True | UUID version 4 | False | True | Include a UUID column |
| set_time: | True | server time | False | True | Include timestamp |
Return type: null (empty response body)
Authorization: bearerAuth
HTTP request headers
Content-Type: application/json
"Authorization": "Bearer {token}"
Examples
Python
xxxxxxxxxximport requestsimport json
baseurl = "https://acme.keym.net:5000/"token = "eyJhbGciOiJIUzI1NiIsInR5cCI6IkpXVCJ9.eyJybmQiOiAiY2QzM2NiMjItYWI0OS00NjNkLWExYzQtYzhmMGI0OTgwZDU1IiwgIm5hbWUiOiAibGlzYSIsICJhZG1pbiI6IGZhbHNlfQ.KCwLDpet78DB1KOUv02W_9HeTkyervzS2y2HYT4VQ2U"url = baseurl + "/getsymkey"
payload = json.dumps({  "maxrows": 10,  "bits": 256,  "formatstring": "'$*'",  "outputformat": "json",  "exclusive_csv": {    "columndelimiter_csv": ",",    "header_if_csv": True  },  "outfilename": "kalleanka",  "isrownumbers": True,  "gen_uuid": True,  "set_time": False})
headers = {    "Authorization": "Bearer " + token,    'Content-Type': 'application/json'}
response = requests.request("GET", url, headers=headers, data=payload)print(response.text)
javascript fetch
xxxxxxxxxxconst baseurl = "https://acme.keym.net:5000/";const token = "eyJhbGciOiJIUzI1NiIsInR5cCI6IkpXVCJ9.eyJybmQiOiAiY2QzM2NiMjItYWI0OS00NjNkLWExYzQtYzhmMGI0OTgwZDU1IiwgIm5hbWUiOiAibGlzYSIsICJhZG1pbiI6IGZhbHNlfQ.KCwLDpet78DB1KOUv02W_9HeTkyervzS2y2HYT4VQ2U";const url = baseurl + "/getsymkey";
const payload = {  maxrows: 10,  bits: 256,  formatstring: "'$*'",  outputformat: "json",  exclusive_csv: {    columndelimiter_csv: ",",    header_if_csv: true  },  outfilename: "kalleanka",  isrownumbers: true,  gen_uuid: true,  set_time: false};
const headers = {  Authorization: `Bearer ${token}`,  "Content-Type": "application/json"};
fetch(url, {  method: "POST",  headers: headers,  body: JSON.stringify(payload)})  .then(response => response.json())  .then(data => console.log(data))  .catch(error => console.error(error));
Curl
xxxxxxxxxxcurl -X POST \ https://acme.keym.net:5000/getsymkey \ -H 'Authorization: Bearer eyJhbGciOiJIUzI1NiIsInR5cCI6IkpXVCJ9.eyJybmQiOiAiY2QzM2NiMjItYWI0OS00NjNkLWExYzQtYzhmMGI0OTgwZDU1IiwgIm5hbWUiOiAibGlzYSIsICJhZG1pbiI6IGZhbHNlfQ.KCwLDpet78DB1KOUv02W_9HeTkyervzS2y2HYT4VQ2U' \ -H 'Content-Type: application/json' \ -d '{ "maxrows": 10, "bits": 256, "formatstring": "'\''$*'\''", "outputformat": "json", "exclusive_csv": { "columndelimiter_csv": ",", "header_if_csv": true }, "outfilename": "kalleanka", "isrownumbers": true, "gen_uuid": true, "set_time": false}' /getsymkeysql - Generates a symmetric key to a SQL table
Json body
xxxxxxxxxx{ "maxrows": 100, "bits": 256, "formatstring": "'$*'", "tablename": "fuubar111", "isrownumbers": true, "gen_uuid": true, "set_time": false}Return type:
Authorization: bearerAuth
HTTP request headers
Content-Type: application/json
"Authorization": "Bearer {token}"
Json body fields explained for /getsymkeysql
| Field | example | possible values | min/ values | max/ values | comment |
|---|---|---|---|---|---|
| maxrows: | 100 | Numeric | 1 | 1.000.000 | Maximum number of rows to generate. |
| bits: | 128 | 64, 128, 256, 512 | 64 | 512 | Multiples of bits shall match formatstring. |
| formatstring: | "'$'" | FDL - Format | N/A | N/A | Refer to the FDL - Format description Language |
| tablename: | "keytbl" | valid tablename | N/A | N/A | Any valid table name database |
| isrownumbers: | True | 1 to maxrows | False | True | Include row numbers |
| gen_uuid: | True | UUID version 4 | False | True | Include UUID column |
| set_time: | True | server time | False | True | Include timestamp |
Response
HTTP Status Codes
| Code | Description |
|---|---|
| 201 | Created. The request was successful, and a new resource has been created. |
| 400 | Bad Request. The request was invalid. |
Examples
xxxxxxxxxximport requestsimport json
baseurl = "https://acme.keym.net:5000/"token = "eyJhbGciOiJIUzI1NiIsInR5cCI6IkpXVCJ9.eyJybmQiOiAiY2QzM2NiMjItYWI0OS00NjNkLWExYzQtYzhmMGI0OTgwZDU1IiwgIm5hbWUiOiAibGlzYSIsICJhZG1pbiI6IGZhbHNlfQ.KCwLDpet78DB1KOUv02W_9HeTkyervzS2y2HYT4VQ2U"url = baseurl + "/getsymkeysql"
payload = json.dumps({  "maxrows": 100,  "bits": 256,  "formatstring": "'$*'",  "tablename": "test_table",  "isrownumbers": True,  "gen_uuid": True,  "set_time": False})
headers = {    "Authorization": "Bearer " + token,    'Content-Type': 'application/json'}
response = requests.request("GET", url, headers=headers, data=payload)
print(response.text)input("Press Enter to continue...")
javascript fetch
xxxxxxxxxxconst baseurl = "https://acme.keym.net:5000/";const token = "eyJhbGciOiJIUzI1NiIsInR5cCI6IkpXVCJ9.eyJybmQiOiAiY2QzM2NiMjItYWI0OS00NjNkLWExYzQtYzhmMGI0OTgwZDU1IiwgIm5hbWUiOiAibGlzYSIsICJhZG1pbiI6IGZhbHNlfQ.KCwLDpet78DB1KOUv02W_9HeTkyervzS2y2HYT4VQ2U";const url = baseurl + "/getsymkeysql";
const payload = JSON.stringify({  maxrows: 100,  bits: 256,  formatstring: "'$*'",  tablename: "test_table",  isrownumbers: true,  gen_uuid: true,  set_time: false});
const headers = {  "Authorization": "Bearer " + token,  "Content-Type": "application/json"};
fetch(url, {  method: "GET",  headers: headers,  body: payload})  .then(response => response.text())  .then(data => {    console.log(data);  });
Curl
xxxxxxxxxxcurl -X GET \ https://acme.keym.net:5000/getsymkeysql \ -H 'Authorization: Bearer eyJhbGciOiJIUzI1NiIsInR5cCI6IkpXVCJ9.eyJybmQiOiAiY2QzM2NiMjItYWI0OS00NjNkLWExYzQtYzhmMGI0OTgwZDU1IiwgIm5hbWUiOiAibGlzYSIsICJhZG1pbiI6IGZhbHNlfQ.KCwLDpet78DB1KOUv02W_9HeTkyervzS2y2HYT4VQ2U' \ -H 'Content-Type: application/json' \ -d '{ "maxrows": 100, "bits": 256, "formatstring": "'\''$*'\''", "tablename": "test_table", "isrownumbers": true, "gen_uuid": true, "set_time": false}' /getuuid - Generates UUID v 4.0
Parameters
| Name | Type | Description | Notes |
|---|---|---|---|
| count | Number | [optional] | |
| typ | String | [optional] |
Return type: Text Authorization: bearerAuth
HTTP request headers
Content-Type: Not defined
Accept: application/json
Examples
Python
xxxxxxxxxximport requestsbaseurl = "https://acme.keym.net:5000/"token = "eyJhbGciOiJIUzI1NiIsInR5cCI6IkpXVCJ9.eyJybmQiOiAiY2QzM2NiMjItYWI0OS00NjNkLWExYzQtYzhmMGI0OTgwZDU1IiwgIm5hbWUiOiAibGlzYSIsICJhZG1pbiI6IGZhbHNlfQ.KCwLDpet78DB1KOUv02W_9HeTkyervzS2y2HYT4VQ2U"url = baseurl + "/getuuid?count=5&typ=json"headers = { "Authorization": "Bearer " + token}response = requests.request("GET", url, headers=headers)print(response.text)javascript fetch
xxxxxxxxxxconst baseurl = "https://acme.keym.net:5000/";const token = "eyJhbGciOiJIUzI1NiIsInR5cCI6IkpXVCJ9.eyJybmQiOiAiY2QzM2NiMjItYWI0OS00NjNkLWExYzQtYzhmMGI0OTgwZDU1IiwgIm5hbWUiOiAibGlzYSIsICJhZG1pbiI6IGZhbHNlfQ.KCwLDpet78DB1KOUv02W_9HeTkyervzS2y2HYT4VQ2U";const url = baseurl + "/getuuid?count=5&typ=json";const headers = {  "Authorization": "Bearer " + token};
fetch(url, {  method: "GET",  headers: headers})  .then(response => response.json())  .then(data => console.log(data))  .catch(error => console.error(error));
Curl
xxxxxxxxxxcurl -X GET \ https://acme.keym.net:5000/getuuid?count=5&typ=json \ -H 'Authorization: Bearer eyJhbGciOiJIUzI1NiIsInR5cCI6IkpXVCJ9.eyJybmQiOiAiY2QzM2NiMjItYWI0OS00NjNkLWExYzQtYzhmMGI0OTgwZDU1IiwgIm5hbWUiOiAibGlzYSIsICJhZG1pbiI6IGZhbHNlfQ.KCwLDpet78DB1KOUv02W_9HeTkyervzS2y2HYT4VQ2U' \ /isrunning - Show if the server is running
Parameters: No parameters
Return type: null (empty response body)
Authorization: bearerAuth
HTTP request headers
Content-Type: Not defined
Accept: application/json
Examples
Python
xxxxxxxxxximport requestsbaseurl = "https://acme.keym.net:5000/"token = "eyJhbGciOiJIUzI1NiIsInR5cCI6IkpXVCJ9.eyJybmQiOiAiY2QzM2NiMjItYWI0OS00NjNkLWExYzQtYzhmMGI0OTgwZDU1IiwgIm5hbWUiOiAibGlzYSIsICJhZG1pbiI6IGZhbHNlfQ.KCwLDpet78DB1KOUv02W_9HeTkyervzS2y2HYT4VQ2U"url = baseurl + "/isrunning"headers = { "Authorization": "Bearer " + token}response = requests.get(url, headers=headers)print(response.text)javascript fetch
xxxxxxxxxxasync function isRunning() {  const baseurl = "https://acme.keym.net:5000/";  const token = "eyJhbGciOiJIUzI1NiIsInR5cCI6IkpXVCJ9.eyJybmQiOiAiY2QzM2NiMjItYWI0OS00NjNkLWExYzQtYzhmMGI0OTgwZDU1IiwgIm5hbWUiOiAibGlzYSIsICJhZG1pbiI6IGZhbHNlfQ.KCwLDpet78DB1KOUv02W_9HeTkyervzS2y2HYT4VQ2U";  const url = baseurl + "/isrunning";
  const response = await fetch(url, {    headers: {      "Authorization": "Bearer " + token    }  });
  const data = await response.text();  console.log(data);}isRunning();
Curl
xxxxxxxxxxcurl -X GET \ https://acme.keym.net:5000/isrunning \ -H 'Authorization: Bearer eyJhbGciOiJIUzI1NiIsInR5cCI6IkpXVCJ9.eyJybmQiOiAiY2QzM2NiMjItYWI0OS00NjNkLWExYzQtYzhmMGI0OTgwZDU1IiwgIm5hbWUiOiAibGlzYSIsICJhZG1pbiI6IGZhbHNlfQ.KCwLDpet78DB1KOUv02W_9HeTkyervzS2y2HYT4VQ2U' /randomnumber - Generates random numbers
Parameters
| Name | Type | Description | Notes |
|---|---|---|---|
| min | Number | [optional] | |
| max | Number | [optional] | |
| count | Number | [optional] | |
| base | String | [optional] | |
| typ | String | [optional] |
Return type
null (empty response body)
Authorization
HTTP request headers
Content-Type: Not defined
Accept: application/json
Examples
Python
xxxxxxxxxxcan you translate this call to javascript fetch and a curl call?import requestsbaseurl = "https://acme.keym.net:5000/"token = "eyJhbGciOiJIUzI1NiIsInR5cCI6IkpXVCJ9.eyJybmQiOiAiY2QzM2NiMjItYWI0OS00NjNkLWExYzQtYzhmMGI0OTgwZDU1IiwgIm5hbWUiOiAibGlzYSIsICJhZG1pbiI6IGZhbHNlfQ.KCwLDpet78DB1KOUv02W_9HeTkyervzS2y2HYT4VQ2U"url = baseurl + "/randomnumber?min=100&max=200&count=10&base=hex&typ=json"payload = "" headers = { "Authorization": "Bearer " + token}response = requests.request("GET", url, headers=headers, data=payload)print(response.text)javascript fetch
xxxxxxxxxxconst baseurl = "https://acme.keym.net:5000/";const token = "eyJhbGciOiJIUzI1NiIsInR5cCI6IkpXVCJ9.eyJybmQiOiAiY2QzM2NiMjItYWI0OS00NjNkLWExYzQtYzhmMGI0OTgwZDU1IiwgIm5hbWUiOiAibGlzYSIsICJhZG1pbiI6IGZhbHNlfQ.KCwLDpet78DB1KOUv02W_9HeTkyervzS2y2HYT4VQ2U";const url = baseurl + "/randomnumber?min=100&max=200&count=10&base=hex&typ=json";
const headers = {  "Authorization": "Bearer " + token,};
fetch(url, {headers})  .then(response => response.text())  .then(data => console.log(data))  .catch(error => console.error(error));
Curl
xxxxxxxxxxcurl -X GET \ https://acme.keym.net:5000/randomnumber?min=100&max=200&count=10&base=hex&typ=json \ -H 'Authorization: Bearer eyJhbGciOiJIUzI1NiIsInR5cCI6IkpXVCJ9.eyJybmQiOiAiY2QzM2NiMjItYWI0OS00NjNkLWExYzQtYzhmMGI0OTgwZDU1IiwgIm5hbWUiOiAibGlzYSIsICJhZG1pbiI6IGZhbHNlfQ.KCwLDpet78DB1KOUv02W_9HeTkyervzS2y2HYT4VQ2U'Appendix 1. Format Description Language FDL
Formatting your output
Many applications has a need for output in other formats than as an example hexadecimal. Sometimes you also need separators between different groups of encryption keys. Keymaker includes some standard formats. But with Keymaker, you can also create your own custom formatted output, exactly tailored to your needs. This without any custom programming . To create a custom format, you use characters from the . The language can mainly be separated in two parts. The flexible format string as this: '########-########' or the quick format as @*10 which creates a output like 0061A856-71B41F05, when you select a 64 bit output. You can also choose other delimiters in your format string as in '########/########' that will produce an output of 001E18D1/0146BFDF. The format string '##-##-##-##/##-##-##-##' creates an output of 'DB-29-59-11/A4-BC-8B-76'. Do not use the reserved characters specified in the table below in format strings.
| Character | Description | Usage/Notes | Example |
|---|---|---|---|
| # | Hexadecimal Digit placeholder | ########-######## | 0061A856-71B41F05 |
| F | CRC-32 of key | ########-########!FFFFFFFF | 0061A856-71B41F05,053010EE |
| $ | base 64 full lenght of key | 0061A85671B41F05 | |
| $* | base 64 full lenght of key with crc32 | 0061A85671B41F05,053010EE | |
| A | Format in ASCII | rg&<$@3B | |
| A* | Format as ASCII with crc32 | rg&<$@3B,F84BFC19 | |
| B | Format in base 64 | a7hOwv+ga7jCuGvC | |
| B* | Format in base 64 with crc32 | a7hOwv+ga7jCuGvC,053010EE | |
| B10 | Base 64 with length 10 | a7hOwv+ga7 | |
| B*10 | Base 64 with length 10 with crc32 | a7hOwv+ga7,053010EE | |
| @ | Numeric positive integer | 199566710131161742035312991318290078543 | |
| @* | Numeric positive integer with crc32 | 199566710131161742035312991318290078543,F84BFC19 | |
| @10 | Numeric positive integer with length 10 | 1491443784 | |
| @*10 | Numeric positive integer with length 10 with crc32 | 1491443784,178EA843 | |
| ! | Reserved characters | Cannot be used in format strings as separators. |
Examples
TODO
Appendix 2. connecting to an External Database
 figure A1. Database Export Settings on the
 Settings page
To export data from your application to an external database table, you need to set the following parameters for your JDBC* connection:
Host: The URL or IP address of the machine where the external database is hosted.
Port: The port number to use for the JDBC connection to the external database. The default port number for most databases is 3306.
User: The username to use for the JDBC connection to the external database. This should be a user with sufficient permissions to write data to the database.
Password: The password for the user specified in the previous step.
Database: The name of the database on the external server where you want to export your application's data.
To configure these settings, follow these steps:
Open the application's settings page.
Navigate to the "Database Export Settings" section.
Enter the Host name or IP address of the external database server.
Enter the Port number for the JDBC connection.
Enter the User name and Password for the JDBC connection.
Enter the Database name for the external database where you want to export your application's data.
Test the connection to ensure that the settings are correct by selecting the Test Connection button. Once you have configured these settings, you can begin exporting your data to the specified external database.
Supported databases
Keymaker™ Supported database engines through Java™ database connectivity (JDBC). This option provides a convenient way to store the keys for future use and integrate them into your existing database management systems. You will find the connection details on the Settings page in the front end application. Supported databases:
Oracle Database
Microsoft SQL Server
MySQL
PostgreSQL
SQLite
IBM DB2
Apache Derby
MariaDB
SAP HANA
Amazon Redshift
*JDBC stands for "Java Database Connectivity." It is a standard Java API that provides a set of interfaces for accessing relational databases from Java programs. JDBC allows Java programs to interact with databases using a uniform set of methods, regardless of the specific database management system being used. JDBC drivers are available for many different types of databases, including Oracle, MySQL, and PostgreSQL, among others. By using JDBC, Java developers can write database-independent code that can be easily ported to different platforms and database systems.
Footnotes
Keymaker™ Supported database engines through Java™ database connectivity (JDBC)5. This option provides a convenient way to store the keys for future use and integrate them into your existing database management systems. You will find the connection details in the Settings tab in the front end application. Supported databases:
Oracle Database
Microsoft SQL Server
MySQL
PostgreSQL
SQLite
IBM DB2
Apache Derby
MariaDB
SAP HANA
Amazon Redshift
Java and JDBC are trademarks or registered trademarks of Oracle Corporation and/or its affiliates. Other names may be trademarks of their respective owners.
Ref: "https://blog.ansi.org/2018/10/sql-standard-iso-iec-9075-2016-ansi-x3-135/" ↩